

February 11, 2019
Dishwasher Repair
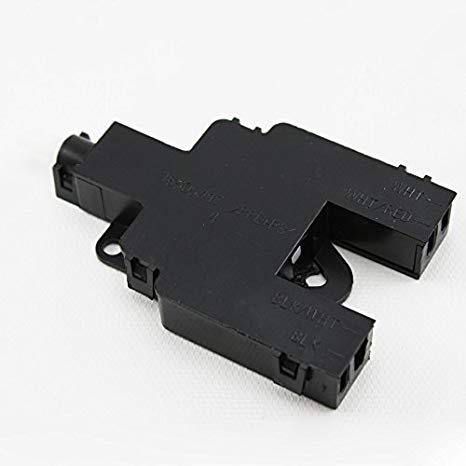
Your dishwasher is built so the water cycles won’t turn on if it senses that the door is open. This prevents accidental water damage, especially if you need to open the door after a cycle has already started. Unfortunately, it also means that your dishwasher is dependent on being able to recognize when the door is shut. That’s controlled by the door interlock switch at the top of your GE dishwasher’s door. Once it breaks down or shorts out, your machine can’t start or continue a cycle. Order part #WD21X10169 to get a new door interlock switch. Then follow these instructions to install it yourself.
1. Unplug the dishwasher.
Every time you plan on opening up an appliance, don’t just turn it off. Make sure the appliance is completely unplugged. During this repair, you’re going to be disconnected wires and removing electrical parts, so this step is absolutely essential.
2. Disassemble the dishwasher.
The door interlock switch is located inside the door behind the control panel. During this step, you’re going to be disassembling the top of the door so you can access the broken part.First, open the door and remove the six screws at the top of the door that hold the internal console in place within the layers of the door. Next, lift the control panel up so it slides free from the top panel. But be careful that you don’t pull the control panel too far away. It’s connected by a wire ribbon to the inside of the door. Carefully set the door back against the appliance without letting the latch engage. Then disconnect the wire ribbon from the middle terminal and set the control panel aside.
3. Remove the old door interlock switch.
Now you can start to remove the actual door interlock switch. Locate the door interlock switch in middle, which looks like an upside-down ‘Y.’ Remove the screw between the two lower legs and carefully set it aside. Don’t let it fall inside the door. Then pry the six locking tabs around the edge of the door interlock switch cover open with a flathead screwdriver. Set the cover aside. Behind the top portion of the cover, you’ll find a spring and a white plunger. Use both hands to secure the two parts and remove them from the housing without letting the spring-fall down. The malfunction in this door switch was either caused by a switch or a worn or broken spring, so look out for sharp metal edges
Now you can remove the two box-like switches from the ‘legs’ of the Y-shaped housing. Take a picture of the wiring’s orientation on both switches so you put them back in the correct terminals on the new switches. Pull each of them out of the housing and then use a flathead screwdriver to pry the switch’s wire terminals free from the wire clips. Make sure the wires don’t slip inside the door either by taping them to the top of the door or carefully pushing a paper towel into the gap below them so they can’t fall. Repeat with both switches
4. Install the new door interlock switch.
You can’t install the whole new switch at once. Instead, you need to pull the parts apart and install them one by one. To start, pry the top cover plate away by releasing the tabs. Set the cover, the plunger, and the spring aside.
5. Reassemble the dishwasher.
First, hold the control panel near the door and reinsert the wire ribbon into the wide middle terminal. Use a flathead screwdriver to make sure all of the locking tabs are engaged and it’s fully plugged in. Next, set the bottom of the control panel in the lip of the front panel. Then tilt the control panel until it’s flush with the door. Open the door at an angle so you can resecure all six screws you removed at the beginning of the repair project. Shut the door and plug the dishwasher back in. Your next cycle should start as soon as you press the button

Apr. 09, 2024
How to Reset a Whirlpool Refrigerator Ice Maker

Apr. 09, 2024
6 Reasons Your LG Refrigerator Is Not Making Ice

Apr. 09, 2024
Kenmore Fridge Ice Maker Not Working? 5 Ways to Fix It

Mar. 06, 2024
How to Remove Fish Smell from Your Refrigerator

Mar. 06, 2024
How To Fix Bosch Dishwasher E24 Error

Mar. 06, 2024
Troubleshooting a Whirlpool Dishwasher Not Draining

Feb. 05, 2024
Why Is Your Fridge Water Not Working, but Ice Is?

Feb. 05, 2024
How to Fix the E15 Bosch Dishwasher Error Code

Feb. 05, 2024
How Much Power Does a Microwave Use?

Jan. 03, 2024
How to Properly Clean Refrigerator Coils

Jan. 03, 2024
How to Fix an LG Washer Showing OE Error Code

Jan. 03, 2024
Troubleshooting a GE Dishwasher with No Power and No Lights

Dec. 11, 2023
10 Reasons Why Your Bosch Dishwasher Won’t Start

Dec. 11, 2023
Troubleshooting the F5 Error Code with a Maytag Washer

Dec. 11, 2023
How To Fix a Kenmore Dryer That Isn’t Heating
(937) 252-3200Text or ring! ring!